Table of Contents
Gradle at its core intentionally provides very little for real world automation. All of the useful
features, like the ability to compile Java code, are added by plugins.
Plugins add new tasks (e.g. JavaCompile), domain objects (e.g.
SourceSet), conventions (e.g. Java source is located at
src/main/java) as well as extending core objects and objects from other plugins.
In this chapter we will discuss how to use plugins and the terminology and concepts surrounding plugins.
Applying a plugin to a project allows the plugin to extend the project's capabilities. It can do things such as:
- Extend the Gradle model (e.g. add new DSL elements that can be configured)
- Configure the project according to conventions (e.g. add new tasks or configure sensible defaults)
- Apply specific configuration (e.g. add organizational repositories or enforce standards)
By applying plugins, rather than adding logic to the project build script, we can reap a number of benefits. Applying plugins:
- Promotes reuse and reduces the overhead of maintaining similar logic across multiple projects
- Allows a higher degree of modularization, enhancing comprehensibility and organization
- Encapsulates imperative logic and allows build scripts to be as declarative as possible
There are two general types of plugins in Gradle, script plugins and binary plugins.
Script plugins are additional build scripts that further configure the build and usually implement a declarative approach to
manipulating the build. They are typically used within a build although they can be externalized and accessed from a remote
location. Binary plugins are classes that implement the Plugin interface and adopt a programmatic
approach to manipulating the build. Binary plugins can reside within a build script, within the project hierarchy or externally
in a plugin jar.
Plugins are said to be applied, which is done via the Project.apply(java.util.Map) method.
The application of plugins is idempotent. That is, the same plugin can be applied multiple times. If the plugin
has previously been applied, any further applications are safe and will have no effect.
Script plugins can be applied from a script on the local filesystem or at a remote location. Filesystem locations are relative to the project directory, while remote script locations are specified with an HTTP URL. Multiple script plugins (of either form) can be applied to a given build.
Plugins can be applied using a plugin id. The plugin id serves as a unique identifier
for a given plugin. Core plugins register a short name that can be used as the plugin id. In the above case, we are
using the short name ‘java’ to apply the JavaPlugin.
Community plugins, on the other hand, use a fully qualified form for the plugin id (e.g. com.github.foo.bar),
although some legacy plugins may still utilize a short, unqualified form.
Rather than using a plugin id, plugins can also be applied by simply specifying the class of the plugin:
The JavaPlugin symbol in the above sample refers to the the JavaPlugin.
This class does not strictly need to be imported as the org.gradle.api.plugins package is automatically imported in all build scripts
(see Section 16.8, “Default imports”). Furthermore, it is not necessary to append .class to identify a class literal in Groovy as it is in Java.
A plugin is simply any class that implements the Plugin interface. Gradle provides
the core plugins as part of its distribution so simply applying the plugin as above is all you need to do.
However, non-core binary plugins need to be available to the build classpath before they can be applied. This can
be achieved in a number of ways, including:
- Defining the plugin as an inline class declaration inside a build script.
- Defining the plugin as a source file under the buildSrc directory in the project (see Section 41.4, “Build sources in the
buildSrcproject”). - Including the plugin from an external jar defined as a buildscript dependency (see Section 25.4, “Applying plugins with the buildscript block”).
- Including the plugin from the plugin portal using the plugins DSL (see Section 25.5, “Applying plugins with the plugins DSL”).
For more on defining your own plugins, see Chapter 39, Writing Custom Plugins.
Binary plugins that have been published as external jar files can be added to a project by adding the plugin to the
build script classpath and then applying the plugin. External jars can be added to the build script classpath
using the buildscript {} block as described in Section 41.6, “External dependencies for the build script”.
Example 25.4. Applying a plugin with the buildscript block
build.gradle
buildscript {
    repositories {
        jcenter()
    }
    dependencies {
        classpath "com.jfrog.bintray.gradle:gradle-bintray-plugin:0.4.1"
    }
}

apply plugin: "com.jfrog.bintray"
The plugins DSL is currently incubating. Please be aware that the DSL and other configuration may change in later Gradle versions.
The new plugins DSL provides a more succinct and convenient way to declare plugin dependencies. It works with the
new Gradle plugin portal to provide easy access to both core and community
plugins. The plugins script block configures an instance of PluginDependenciesSpec.
To apply a core plugin, the short name can be used:
To apply a community plugin from the portal, the fully qualified plugin id must be used:
Example 25.6. Applying a community plugin
build.gradle
plugins {
    id "com.jfrog.bintray" version "0.4.1"
}
No further configuration is necessary. Specifically, there is no need to configure the buildscript classpath. Gradle will resolve the plugin in the plugin portal, locate it, and make it available to the build.
See PluginDependenciesSpec for more information on using the Plugin DSL.
The new way to add plugins to a project is much more than a more convenient syntax. The new DSL is processed very differently to the old one. The new mechanism allows Gradle to determine the plugins in use very early and very quickly. This allows Gradle to do smart things such as:
- Optimize the loading and reuse of plugin classes.
- Allow different plugins to use different versions of dependencies.
- Provide editors detailed information about the potential properties and values in the buildscript for editing assistance.
This requires that plugins be specified in a way that Gradle can easily and quickly extract, before executing the rest of the build script. It also requires that the definition of plugins to use be somewhat static.
There are some key differences between the new plugin mechanism and the “traditional” apply() method
mechanism. There are also some constraints, some of which are temporary limitations while the mechanism is still
being developed and some are inherent to the new approach.
The new plugins {} block does not support arbitrary Groovy code. It is constrained, in order to be idempotent
(produce the same result every time) and side effect free (safe for Gradle to execute at any time).
The form is:
plugins {
    id «plugin id» version «plugin version»
}
Where «plugin version» and «plugin id» must be constant, literal, strings.
No other statements are allowed; their presence will cause a compilation error.
The plugins {} block must also be a top level statement in the buildscript. It cannot be nested inside
another construct (e.g. an if-statement or for-loop).
The plugins {} block can currently only be used in a project's build script. It cannot be used in
script plugins, the settings.gradle file or init scripts.
Future versions of Gradle will remove this restriction.
It is not possible to use the familiar pattern of applying a plugin to multiple projects at once using subprojects {},
etc at the moment. There is currently no mechanism for applying a plugin to multiple projects at once. At the moment, each
project that requires a plugin must declare so in the plugins {} block in its buildscript.
Future versions of Gradle will remove this restriction.
If the restrictions of the new syntax are prohibitive, the recommended approach is to apply plugins using the buildscript {} block.
The pluginRepositories {} DSL is currently incubating.
Please be aware that the DSL and other configuration may change in later Gradle versions.
By default, the plugins {} DSL resolves plugins from the public Gradle Plugin Portal.
Many build authors would also like to resolve plugins from private Maven or Ivy repositories because the plugins contain proprietary implementation
details, or just to have more control over what plugins are available to their builds.
To specify custom plugin repositories, add a pluginRepositories {} block to the settings.gradle file:
Example 25.7. Using plugins from custom plugin repositories.
settings.gradle
pluginRepositories {
  maven {
    url 'maven-repo'
  }
  gradlePluginPortal()
  ivy {
    url 'ivy-repo'
  }
}
This tells Gradle to first look in the Maven repository at maven-repo when resolving plugins and then to
check the Gradle Plugin Portal if the plugins are not found in the Maven repository. If you don't want the Gradle Plugin Portal to be searched,
omit the gradlePluginPortal() line. Finally, the Ivy repository at ivy-repo will be checked.
The pluginRepositories {} block may only appear in the settings.gradle file, and must be the first block in the file.
Custom Maven and Ivy plugin repositories must contain plugin marker artifacts in addition to the artifacts
which actually implement the plugin. For more information on publishing plugins to custom repositories read Chapter 40, The Java Gradle Plugin Development Plugin.
See PluginRepositoriesSpec for complete documentation for using the
pluginRepositories {} block.
Since the plugins {} DSL block only allows for declaring plugins by their globally unique plugin id and
version properties, Gradle needs a way to look up the coordinates of the plugin implementation artifact. To do so,
Gradle will look for a Plugin Marker Artifact with the coordinates plugin.id:plugin.id.gradle.plugin:plugin.version.
This marker needs to have a dependency on the actual plugin implementation. Publishing these markers is automated by the
java-gradle-plugin.
For example, the following complete sample from the sample-plugins project shows how to publish a
org.gradle.sample.hello plugin and a org.gradle.sample.goodbye plugin to both an Ivy and Maven repository
using the combination of the java-gradle-plugin, the
maven-publish plugin, and the ivy-publish plugin.
Example 25.8. Complete Plugin Publishing Sample
build.gradle
plugins {
  id 'java-gradle-plugin'
  id 'maven-publish'
  id 'ivy-publish'
}

group 'org.gradle.sample'
version '1.0.0'

gradlePlugin {
  plugins {
    hello {
      id = "org.gradle.sample.hello"
      implementationClass = "org.gradle.sample.hello.HelloPlugin"
    }
    goodbye {
      id = "org.gradle.sample.goodbye"
      implementationClass = "org.gradle.sample.goodbye.GoodbyePlugin"
    }
  }
}

publishing {
  repositories {
    maven {
      url "../consuming/maven-repo"
    }
    ivy {
      url "../consuming/ivy-repo"
    }
  }
}
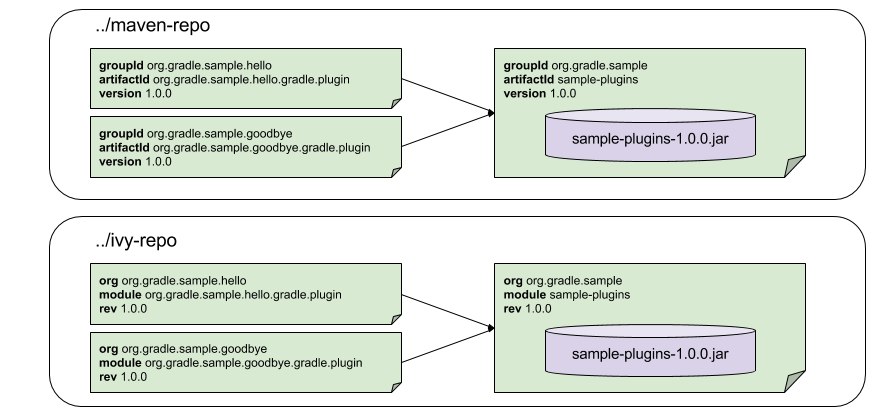
Running gradle publish in the sample directory causes the following repo layouts to exist:
Gradle has a vibrant community of plugin developers who contribute plugins for a wide variety of capabilities. The Gradle plugin portal provides an interface for searching and exploring community plugins.
This chapter aims to serve as an introduction to plugins and Gradle and the role they play. For more information on the inner workings of plugins, see Chapter 39, Writing Custom Plugins.