Table of Contents
- 69.1. Usage
- 69.2. Limitations
- 69.3. Software Model
- 69.4. Project Layout
- 69.5. Tasks
- 69.6. Finding out more about your project
- 69.7. Running a Play application
- 69.8. Configuring a Play application
- 69.9. Multi-project Play applications
- 69.10. Packaging a Play application for distribution
- 69.11. Building a Play application with an IDE
- 69.12. Resources
Support for building Play applications is currently incubating. Please be aware that the DSL, APIs and other configuration may change in later Gradle versions.
Play is a modern web application framework. The Play plugin adds support for building, testing and running Play applications with Gradle.
The Play plugin makes use of the Gradle software model.
To use the Play plugin, include the following in your build script to apply the play plugin and add the Typesafe repositories:
Example 69.1. Using the Play plugin
build.gradle
plugins {
    id 'play'
}

repositories {
    jcenter()
    maven {
        name "typesafe-maven-release"
        url "https://repo.typesafe.com/typesafe/maven-releases"
    }
    ivy {
        name "typesafe-ivy-release"
        url "https://repo.typesafe.com/typesafe/ivy-releases"
        layout "ivy"
    }
}
Note that defining the Typesafe repositories is necessary. In future versions of Gradle, this will be replaced with a more convenient syntax.
The Play plugin currently has a few limitations.
Full support is limited to Play 2.3.x applications. Limited support is available for Play 2.4.x applications. Gradle does not include support for a few new build-related features in 2.4. Specifically, Gradle does not yet support aggregate reverse routes. Future Gradle versions will add more support for Play 2.5.x and 2.6.x.
A given project may only define a single Play application. This means that a single project cannot build more than one Play application. However, a multi-project build can have many projects that each define their own Play application.
Play applications can only target a single “platform” (combination of Play, Scala and Java version) at a time. This means that it is currently not possible to define multiple variants of a Play application that, for example, produce jars for both Scala 2.10 and 2.11. This limitation may be lifted in future Gradle versions.
Support for generating IDE configurations for Play applications is limited to IDEA.
The Play plugin uses a software model to describe a Play application and how to build it. The Play software model extends the base Gradle software model
to add support for building Play applications. A Play application is represented by a PlayApplicationSpec component type. The plugin automatically
creates a single PlayApplicationBinarySpec instance when it is applied. Additional Play components cannot be added to a project.
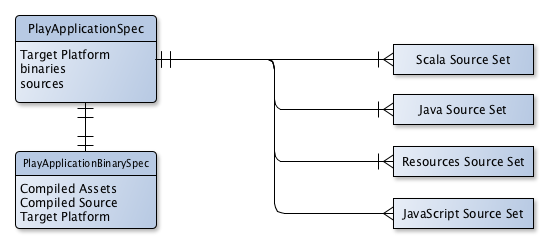
A Play application component describes the application to be built and consists of several configuration elements. One type of element that
describes the application are the source sets that define where the application controller, route, template and model class source
files should be found. These source sets are logical groupings of files of a particular type and a default source set for each type is
created when the play plugin is applied.
Table 69.1. Default Play source sets
| Source Set | Type | Directory | Filters |
| java | JavaSourceSet |
app | **/*.java |
| scala | ScalaLanguageSourceSet |
app | **/*.scala |
| routes | RoutesSourceSet |
conf | routes, *.routes |
| twirlTemplates | TwirlSourceSet |
app | **/*.html |
| javaScript | JavaScriptSourceSet |
app/assets | **/*.js |
These source sets can be configured or additional source sets can be added to the Play component. See Configuring Play for further information.
Another element of configuring a Play application is the platform. To build a Play application, Gradle needs to understand which versions of Play, Scala and Java to use.
The Play component specifies this requirement as a PlayPlatform. If these values are not configured, a default version of Play, Scala and Java
will be used. See Targeting a certain version of Play for information on configuring the Play platform.
Note that only a single platform can be specified for a given Play component. This means that only a single version of Play, Scala and Java can be used to build a Play component. In other words, a Play component can only produce one set of outputs, and those outputs will be built using the versions specified by the platform configured on the component.
A Play application component is compiled and packaged to produce a set of outputs which are represented by a PlayApplicationBinarySpec.
The Play binary specifies the jar files produced by building the component as well as providing elements by which additional content can be added to those jar files.
It also exposes the tasks involved in building the component and creating the binary.
See Configuring Play for examples of configuring the Play binary.
The Play plugin follows the typical Play application layout. You can configure source sets to include additional directories or change the defaults.
├── app                 → Application source code.
│   ├── assets          → Assets that require compilation.
│   │   └── javascripts → JavaScript source code to be minified.
│   ├── controllers     → Application controller source code.
│   ├── models          → Application business source code.
│   └── views           → Application UI templates.
├── build.gradle        → Your project's build script.
├── conf                → Main application configuration file and routes files.
├── public              → Public assets.
│   ├── images          → Application image files.
│   ├── javascripts     → Typically JavaScript source code.
│   └── stylesheets     → Typically CSS source code.
└── test                → Test source code.
The Play plugin hooks into the normal Gradle lifecycle tasks such as assemble, check and build,
but it also adds several additional tasks which form the lifecycle of a Play project:
Table 69.2. Play plugin - lifecycle tasks
| Task name | Depends on | Type | Description |
playBinary
|
All compile tasks for source sets added to the Play application. | Task |
Performs a build of just the Play application. |
dist
|
createPlayBinaryZipDist, createPlayBinaryTarDist
|
Task |
Assembles the Play distribution. |
stage
|
stagePlayBinaryDist
|
Task |
Stages the Play distribution. |
The plugin also provides tasks for running, testing and packaging your Play application:
Table 69.3. Play plugin - running and testing tasks
| Task name | Depends on | Type | Description |
runPlayBinary
|
playBinary to build Play application.
|
PlayRun |
Runs the Play application for local development. See how this works with continuous build. |
testPlayBinary
|
playBinary to build Play application and compilePlayBinaryTests.
|
Test |
Runs JUnit/TestNG tests for the Play application. |
For the different types of sources in a Play application, the plugin adds the following compilation tasks:
Table 69.4. Play plugin - source set tasks
| Task name | Source Type | Type | Description |
compilePlayBinaryScala
|
Scala and Java | PlatformScalaCompile |
Compiles all Scala and Java sources defined by the Play application. |
compilePlayBinaryPlayTwirlTemplates
|
Twirl HTML templates | TwirlCompile |
Compiles HTML templates with the Twirl compiler. |
compilePlayBinaryPlayRoutes
|
Play Route files | RoutesCompile |
Compiles routes files into Scala sources. |
minifyPlayBinaryJavaScript
|
JavaScript files | JavaScriptMinify |
Minifies JavaScript files with the Google Closure compiler. |
Gradle provides a report that you can run from the command-line that shows some details about the components and binaries that your
project produces. To use this report, just run gradle components. Below is an example of running this report for
one of the sample projects:
Example 69.2. The components report
Output of gradle components
> gradle components
:components

------------------------------------------------------------
Root project
------------------------------------------------------------

Play Application 'play'
-----------------------

Source sets
    Java source 'play:java'
        srcDir: app
        includes: **/*.java
    JavaScript source 'play:javaScript'
        srcDir: app/assets
        includes: **/*.js
    JVM resources 'play:resources'
        srcDir: conf
    Routes source 'play:routes'
        srcDir: conf
        includes: routes, *.routes
    Scala source 'play:scala'
        srcDir: app
        includes: **/*.scala
    Twirl template source 'play:twirlTemplates'
        srcDir: app
        includes: **/*.html

Binaries
    Play Application Jar 'play:binary'
        build using task: :playBinary
        target platform: Play Platform (Play 2.3.9, Scala: 2.11, Java: Java SE 8)
        toolchain: Default Play Toolchain
        classes dir: build/playBinary/classes
        resources dir: build/playBinary/resources
        JAR file: build/playBinary/lib/basic.jar

Note: currently not all plugins register their components, so some components may not be visible here.

BUILD SUCCESSFUL

Total time: 1 secs
The runPlayBinary task starts the Play application under development.
During development it is beneficial to execute this task as a continuous build.
Continuous build is a generic feature that supports automatically re-running a build when inputs change.
The runPlayBinary task is “continuous build aware” in that it behaves differently when run as part of a continuous build.
When not run as part of a continuous build, the runPlayBinary task will block the build.
That is, the task will not complete as long as the application is running.
When running as part of a continuous build, the task will start the application if not running and otherwise propagate any changes to the code of the application to the running instance.
This is useful for quickly iterating on your Play application with an edit->rebuild->refresh cycle. Changes to your application will not take affect until the end of the overall build.
To enable continuous build, run Gradle with -t runPlayBinary or --continuous runPlayBinary.
Users of Play used to such a workflow with Play's default build system should note that compile errors are handled differently. If a build failure occurs during a continuous build, the Play application will not be reloaded. Instead, you will be presented with an exception message. The exception message will only contain the overall cause of the build failure. More detailed information will only be available from the console.
By default, Gradle uses Play 2.3.9, Scala 2.11 and the version of Java used to start the build.
A Play application can select a different version by specifying a target PlayApplicationSpec.platform(java.lang.Object) on the Play application component.
Example 69.3. Selecting a version of the Play Framework
build.gradle
model {
    components {
        play {
            platform play: '2.3.6', scala: '2.10'
        }
    }
}
You can add compile, test and runtime dependencies to a Play application through Configuration created by the Play plugin.
If you are coming from SBT, the Play SBT plugin provides short names for common dependencies. For instance, if your project has a dependency on
ws, you will need to add a dependency to com.typesafe.play:play-ws_2.11:2.3.9 where 2.11
is your Scala version and 2.3.9 is your Play framework version.
Other dependencies that have short names, such as jacksons may actually be multiple dependencies. For those dependencies, you will need to work out the dependency
coordinates from a dependency report.
playis used for compile time dependencies.playTestis used for test compile time dependencies.playRunis used for run time dependencies.
Example 69.4. Adding dependencies to a Play application
build.gradle
dependencies {
    play "commons-lang:commons-lang:2.6"
}
You can further configure the default source sets to do things like add new directories, add filters, etc.
If your Play application has additional sources that exist in non-standard directories, you can add extra source sets that Gradle will automatically add to the appropriate compile tasks.
Example 69.5. Adding extra source sets to a Play application
build.gradle
model {
    components {
        play {
            sources {
                java {
                    source.srcDir "additional/java"
                }
                javaScript {
                    source {
                        srcDir "additional/javascript"
                        exclude "**/old_*.js"
                    }
                }
            }
        }
    }
}
build.gradle
model {
    components {
        play {
            sources {
                extraJava(JavaSourceSet) {
                    source.srcDir "extra/java"
                }
                extraTwirl(TwirlSourceSet) {
                    source.srcDir "extra/twirl"
                }
                extraRoutes(RoutesSourceSet) {
                    source.srcDir "extra/routes"
                }
            }
        }
    }
}
If your Play application requires additional Scala compiler flags, you can add these arguments directly to the Scala compiler task.
Example 69.6. Configuring Scala compiler options
build.gradle
model {
    components {
        play {
            binaries.all {
                tasks.withType(PlatformScalaCompile) {
                    scalaCompileOptions.additionalParameters = ["-feature", "-language:implicitConversions"]
                }
            }
        }
    }
}
If your Play application's router uses dependency injection to access your controllers, you'll need to configure your application to not use the default static router.
Under the covers, the Play plugin is using the InjectedRoutesGenerator instead of the default StaticRoutesGenerator to generate the router classes.
Example 69.7. Configuring routes style
build.gradle
model {
    components {
        play {
            injectedRoutesGenerator = true
        }
    }
}
Gradle Play support comes with a simplistic asset processing pipeline that minifies JavaScript assets. However, many organizations have their own
custom pipeline for processing assets. You can easily hook the results of your pipeline into the Play binary by utilizing the PublicAssets
property on the binary.
Example 69.8. Configuring a custom asset pipeline
build.gradle
model {
    components {
        play {
            binaries.all { binary ->
                tasks.create("addCopyrightToPlay${binary.name.capitalize()}Assets", AddCopyrights) { copyrightTask ->
                    source "raw-assets"
                    copyrightFile = project.file('copyright.txt')
                    destinationDir = project.file("${buildDir}/play${binary.name.capitalize()}/addCopyRights")

                    // Hook this task into the binary
                    binary.assets.addAssetDir destinationDir
                    binary.assets.builtBy copyrightTask
                }
            }
        }
    }
}

class AddCopyrights extends SourceTask {
    @InputFile
    File copyrightFile

    @OutputDirectory
    File destinationDir

    @TaskAction
    void generateAssets() {
        String copyright = copyrightFile.text
        getSource().files.each { File file ->
            File outputFile = new File(destinationDir, file.name)
            outputFile.text = "${copyright}\n${file.text}"
        }
    }
}
Play applications can be built in multi-project builds as well. Simply apply the play plugin in the appropriate subprojects and create any
project dependencies on the play configuration.
Example 69.9. Configuring dependencies on Play subprojects
build.gradle
dependencies {
    play project(":admin")
    play project(":user")
    play project(":util")
}
See the play/multiproject sample provided in the Gradle distribution for a working example.
Gradle provides the capability to package your Play application so that it can easily be distributed and run in a target environment. The distribution package (zip file) contains the Play binary jars, all dependencies, and generated scripts that set up the classpath and run the application in a Play-specific Netty container.
The distribution can be created by running the dist lifecycle task and places the distribution in the $buildDir/distributions directory. Alternatively,
one can validate the contents by running the stage lifecycle task which copies the files to the $buildDir/stage directory using the layout of the distribution package.
Table 69.5. Play distribution tasks
| Task name | Depends on | Type | Description |
createPlayBinaryStartScripts
|
- | CreateStartScripts |
Generates scripts to run the Play application distribution. |
stagePlayBinaryDist
|
playBinary, createPlayBinaryStartScripts
|
Copy |
Copies all jar files, dependencies and scripts into a staging directory. |
createPlayBinaryZipDist
|
Zip |
Bundles the Play application as a standalone distribution packaged as a zip. | |
createPlayBinaryTarDist
|
Tar |
Bundles the Play application as a standalone distribution packaged as a tar. | |
stage
|
stagePlayBinaryDist |
Task |
Lifecycle task for staging a Play distribution. |
dist
|
createPlayBinaryZipDist, createPlayBinaryTarDist
|
Task |
Lifecycle task for creating a Play distribution. |
You can add additional files to the distribution package using the Distribution API.
Example 69.10. Add extra files to a Play application distribution
build.gradle
model {
    distributions {
        playBinary {
            contents {
                from("README.md")
                from("scripts") {
                    into "bin"
                }
            }
        }
    }
}
If you want to generate IDE metadata configuration for your Play project, you need to apply the appropriate IDE plugin. Gradle supports generating IDE metadata for IDEA only for Play projects at this time.
To generate IDEA's metadata, apply the idea plugin along with the play plugin.
Source code generated by routes and Twirl templates cannot be generated by IDEA directly, so changes made to those files will not affect compilation until the next Gradle build. You can run the Play application with Gradle in continuous build to automatically rebuild and reload the application whenever something changes.
For additional information about developing Play applications: