Table of Contents
In the introductory tutorial (Chapter 15, Build Script Basics) you learned how to create simple tasks. You also learned how to add additional behavior to these tasks later on, and you learned how to create dependencies between tasks. This was all about simple tasks, but Gradle takes the concept of tasks further. Gradle supports enhanced tasks, which are tasks that have their own properties and methods. This is really different from what you are used to with Ant targets. Such enhanced tasks are either provided by you or built into Gradle.
We have already seen how to define tasks using a keyword style in Chapter 15, Build Script Basics. There are a few variations on this style, which you may need to use in certain situations. For example, the keyword style does not work in expressions.
Example 18.1. Defining tasks
build.gradle
task(hello) << {
    println "hello"
}

task(copy, type: Copy) {
    from(file('srcDir'))
    into(buildDir)
}
You can also use strings for the task names:
Example 18.2. Defining tasks - using strings for task names
build.gradle
task('hello') <<
{
    println "hello"
}

task('copy', type: Copy) {
    from(file('srcDir'))
    into(buildDir)
}
There is an alternative syntax for defining tasks, which you may prefer to use:
Example 18.3. Defining tasks with alternative syntax
build.gradle
tasks.create(name: 'hello') << {
    println "hello"
}

tasks.create(name: 'copy', type: Copy) {
    from(file('srcDir'))
    into(buildDir)
}
Here we add tasks to the tasks collection. Have a look at
TaskContainer for more variations of the create()
method.
You often need to locate the tasks that you have defined in the build file, for example, to configure them or use them for dependencies. There are a number of ways of doing this. Firstly, each task is available as a property of the project, using the task name as the property name:
Example 18.4. Accessing tasks as properties
build.gradle
task hello

println hello.name
println project.hello.name
Tasks are also available through the tasks collection.
Example 18.5. Accessing tasks via tasks collection
build.gradle
task hello

println tasks.hello.name
println tasks['hello'].name
You can access tasks from any project using the task's path using the tasks.getByPath()
method. You can call the getByPath() method with a task name, or a relative path, or an
absolute path.
Example 18.6. Accessing tasks by path
build.gradle
project(':projectA') {
    task hello
}

task hello

println tasks.getByPath('hello').path
println tasks.getByPath(':hello').path
println tasks.getByPath('projectA:hello').path
println tasks.getByPath(':projectA:hello').path
Output of gradle -q hello
> gradle -q hello
:hello
:hello
:projectA:hello
:projectA:hello
Have a look at TaskContainer for more options for locating tasks.
As an example, let's look at the Copy task provided by Gradle. To create a
Copy task for your build, you can declare in your build script:
This creates a copy task with no default behavior.
The task can be configured using its API (see Copy).
The following examples show several different ways to achieve the same configuration.
Just to be clear, realize that the name of this task is “myCopy”, but it is of
type “Copy”. You can have multiple tasks of the same
type, but with different names. You'll find this gives you a lot of power to implement
cross-cutting concerns across all tasks of a particular type.
Example 18.8. Configuring a task - various ways
build.gradle
Copy myCopy = task(myCopy, type: Copy)
myCopy.from 'resources'
myCopy.into 'target'
myCopy.include('**/*.txt', '**/*.xml', '**/*.properties')
This is similar to the way we would configure objects in Java. You have to repeat the context
(myCopy) in the configuration statement every time. This is a redundancy and not very
nice to read.
There is another way of configuring a task. It also preserves the context and it is arguably the most readable. It is usually our favorite.
Example 18.9. Configuring a task - with closure
build.gradle
task myCopy(type: Copy)

myCopy {
   from 'resources'
   into 'target'
   include('**/*.txt', '**/*.xml', '**/*.properties')
}
This works for any task. Line 3 of the example is just a shortcut for the
tasks.getByName() method. It is important to note that if you pass a closure to the
getByName() method, this closure is applied to configure the task, not when
the task executes.
You can also use a configuration closure when you define a task.
Example 18.10. Defining a task with closure
build.gradle
task copy(type: Copy) {
   from 'resources'
   into 'target'
   include('**/*.txt', '**/*.xml', '**/*.properties')
}
Don't forget about the build phases
A task has both configuration and actions.
When using the <<, you are simply using a shortcut to define an action.
Code defined in the configuration section of your task will get executed during the configuration phase of the build regardless of what task was targeted.
See Chapter 21, The Build Lifecycle for more details about the build lifecycle.
There are several ways you can define the dependencies of a task. In
Section 15.5, “Task dependencies”
you were introduced to defining dependencies using task names. Task names can refer to tasks in the same
project as the task, or to tasks in other projects. To refer to a task in another project, you prefix the
name of the task with the path of the project it belongs to. The following is an example which adds a dependency
from
projectA:taskX
to
projectB:taskY:
Example 18.11. Adding dependency on task from another project
build.gradle
project('projectA') {
    task taskX(dependsOn: ':projectB:taskY') << {
        println 'taskX'
    }
}

project('projectB') {
    task taskY << {
        println 'taskY'
    }
}
Output of gradle -q taskX
> gradle -q taskX
taskY
taskX
Instead of using a task name, you can define a dependency using a
Task object, as shown in this example:
Example 18.12. Adding dependency using task object
build.gradle
task taskX << {
    println 'taskX'
}

task taskY << {
    println 'taskY'
}

taskX.dependsOn taskY
Output of gradle -q taskX
> gradle -q taskX
taskY
taskX
For more advanced uses, you can define a task dependency using a closure. When evaluated, the closure is
passed the task whose dependencies are being calculated. The closure should return a single
Task or collection of Task objects, which are then treated
as dependencies of the task. The following example adds a dependency from taskX
to all the tasks in the project whose name starts with lib:
Example 18.13. Adding dependency using closure
build.gradle
task taskX << {
    println 'taskX'
}

taskX.dependsOn {
    tasks.findAll { task -> task.name.startsWith('lib') }
}

task lib1 << {
    println 'lib1'
}

task lib2 << {
    println 'lib2'
}

task notALib << {
    println 'notALib'
}
Output of gradle -q taskX
> gradle -q taskX
lib1
lib2
taskX
For more information about task dependencies, see the Task API.
Task ordering is an incubating feature. Please be aware that this feature may change in later Gradle versions.
In some cases it is useful to control the order in which 2 tasks will execute, without introducing an explicit dependency between those tasks. The primary difference between a task ordering and a task dependency is that an ordering rule does not influence which tasks will be executed, only the order in which they will be executed.
Task ordering can be useful in a number of scenarios:
- Enforce sequential ordering of tasks: e.g. 'build' never runs before 'clean'.
- Run build validations early in the build: e.g. validate I have the correct credentials before starting the work for a release build.
- Get feedback faster by running quick verification tasks before long verification tasks: e.g. unit tests should run before integration tests.
- A task that aggregates the results of all tasks of a particular type: e.g. test report task combines the outputs of all executed test tasks.
There are two ordering rules available: “must run after” and “should run after”.
When you use the “must run after” ordering rule you specify that taskB must always
run after taskA, whenever both taskA and taskB will
be run. This is expressed as taskB.mustRunAfter(taskA). The “should run
after” ordering rule is similar but less strict as it will be ignored in two situations. Firstly if using
that rule introduces an ordering cycle. Secondly when using parallel execution and all dependencies of a
task have been satisfied apart from the “should run after” task, then this task will be run regardless of
whether its “should run after” dependencies have been run or not. You should use “should run after”
where the ordering is helpful but not strictly required.
With these rules present it is still possible to execute taskA without taskB and vice-versa.
Example 18.14. Adding a 'must run after' task ordering
build.gradle
task taskX << {
    println 'taskX'
}
task taskY << {
    println 'taskY'
}
taskY.mustRunAfter taskX
Output of gradle -q taskY taskX
> gradle -q taskY taskX
taskX
taskY
Example 18.15. Adding a 'should run after' task ordering
build.gradle
task taskX << {
    println 'taskX'
}
task taskY << {
    println 'taskY'
}
taskY.shouldRunAfter taskX
Output of gradle -q taskY taskX
> gradle -q taskY taskX
taskX
taskY
In the examples above, it is still possible to execute taskY without causing taskX to run:
Example 18.16. Task ordering does not imply task execution
Output of gradle -q taskY
> gradle -q taskY
taskY
To specify a “must run after” or “should run after” ordering between 2 tasks, you use the Task.mustRunAfter(java.lang.Object[]) and Task.shouldRunAfter(java.lang.Object[]) methods.
These methods accept a task instance, a task name or any other input accepted by Task.dependsOn(java.lang.Object[]).
Note that “B.mustRunAfter(A)” or “B.shouldRunAfter(A)” does not imply any execution dependency between the tasks:
- It is possible to execute tasks
AandBindependently. The ordering rule only has an effect when both tasks are scheduled for execution. - When run with
--continue, it is possible forBto execute in the event thatAfails.
As mentioned before, the “should run after” ordering rule will be ignored if it introduces an ordering cycle:
Example 18.17. A 'should run after' task ordering is ignored if it introduces an ordering cycle
build.gradle
task taskX << {
    println 'taskX'
}
task taskY << {
    println 'taskY'
}
task taskZ << {
    println 'taskZ'
}
taskX.dependsOn taskY
taskY.dependsOn taskZ
taskZ.shouldRunAfter taskX
Output of gradle -q taskX
> gradle -q taskX
taskZ
taskY
taskX
You can add a description to your task. This description is displayed when executing
gradle tasks.
Example 18.18. Adding a description to a task
build.gradle
task copy(type: Copy) {
   description 'Copies the resource directory to the target directory.'
   from 'resources'
   into 'target'
   include('**/*.txt', '**/*.xml', '**/*.properties')
}
Sometimes you want to replace a task. For example, if you want to exchange a task added by the Java plugin with a custom task of a different type. You can achieve this with:
Example 18.19. Overwriting a task
build.gradle
task copy(type: Copy)

task copy(overwrite: true) << {
    println('I am the new one.')
}
Output of gradle -q copy
> gradle -q copy
I am the new one.
This will replace a task of type Copy with the task you've defined, because it
uses the same name. When you define the new task, you have to set the overwrite property
to true. Otherwise Gradle throws an exception, saying that a task with that name already exists.
Gradle offers multiple ways to skip the execution of a task.
You can use the onlyIf() method to attach a predicate to a task. The task's
actions are only executed if the predicate evaluates to true. You implement the predicate as a closure.
The closure is passed the task as a parameter, and should return true if the task should execute
and false if the task should be skipped. The predicate is evaluated just before the task is due
to be executed.
Example 18.20. Skipping a task using a predicate
build.gradle
task hello << {
    println 'hello world'
}

hello.onlyIf { !project.hasProperty('skipHello') }
Output of gradle hello -PskipHello
> gradle hello -PskipHello
:hello SKIPPED

BUILD SUCCESSFUL

Total time: 1 secs
If the logic for skipping a task can't be expressed with a predicate, you can use the
StopExecutionException. If this exception is thrown by an action,
the further execution of this action as well as the execution of
any following action of this task is skipped. The build continues with executing the next task.
Example 18.21. Skipping tasks with StopExecutionException
build.gradle
task compile << {
    println 'We are doing the compile.'
}

compile.doFirst {
    // Here you would put arbitrary conditions in real life.
    // But this is used in an integration test so we want defined behavior.
    if (true) { throw new StopExecutionException() }
}
task myTask(dependsOn: 'compile') << {
   println 'I am not affected'
}
Output of gradle -q myTask
> gradle -q myTask
I am not affected
This feature is helpful if you work with tasks provided by Gradle. It allows you to add conditional execution of the built-in actions of such a task. [7]
Every task has an enabled
flag which defaults to true. Setting it to false prevents the
execution of any of the task's actions.
Example 18.22. Enabling and disabling tasks
build.gradle
task disableMe << {
    println 'This should not be printed if the task is disabled.'
}
disableMe.enabled = false
Output of gradle disableMe
> gradle disableMe
:disableMe SKIPPED

BUILD SUCCESSFUL

Total time: 1 secs
An important part of any build tool is the ability to avoid doing work that has already been done. Consider the process of compilation. Once your source files have been compiled, there should be no need to recompile them unless something has changed that affects the output, such as the modification of a source file or the removal of an output file. And compilation can take a significant amount of time, so skipping the step when it’s not needed saves a lot of time.
Gradle supports this behavior out of the box through a feature it calls incremental build.
You have almost certainly already seen it in action: it’s active nearly[8] every time the UP-TO-DATE text appears next to the name of a
task when you run a build.
How does incremental build work? And what does it take to make use of it in your own tasks? Let’s take a look.
In the most common case, a task takes some inputs and generates some outputs. If we use the compilation example from earlier, we can see that the source files are the inputs and, in the case of Java, the generated class files are the outputs. Other inputs might include things like whether debug information should be included.
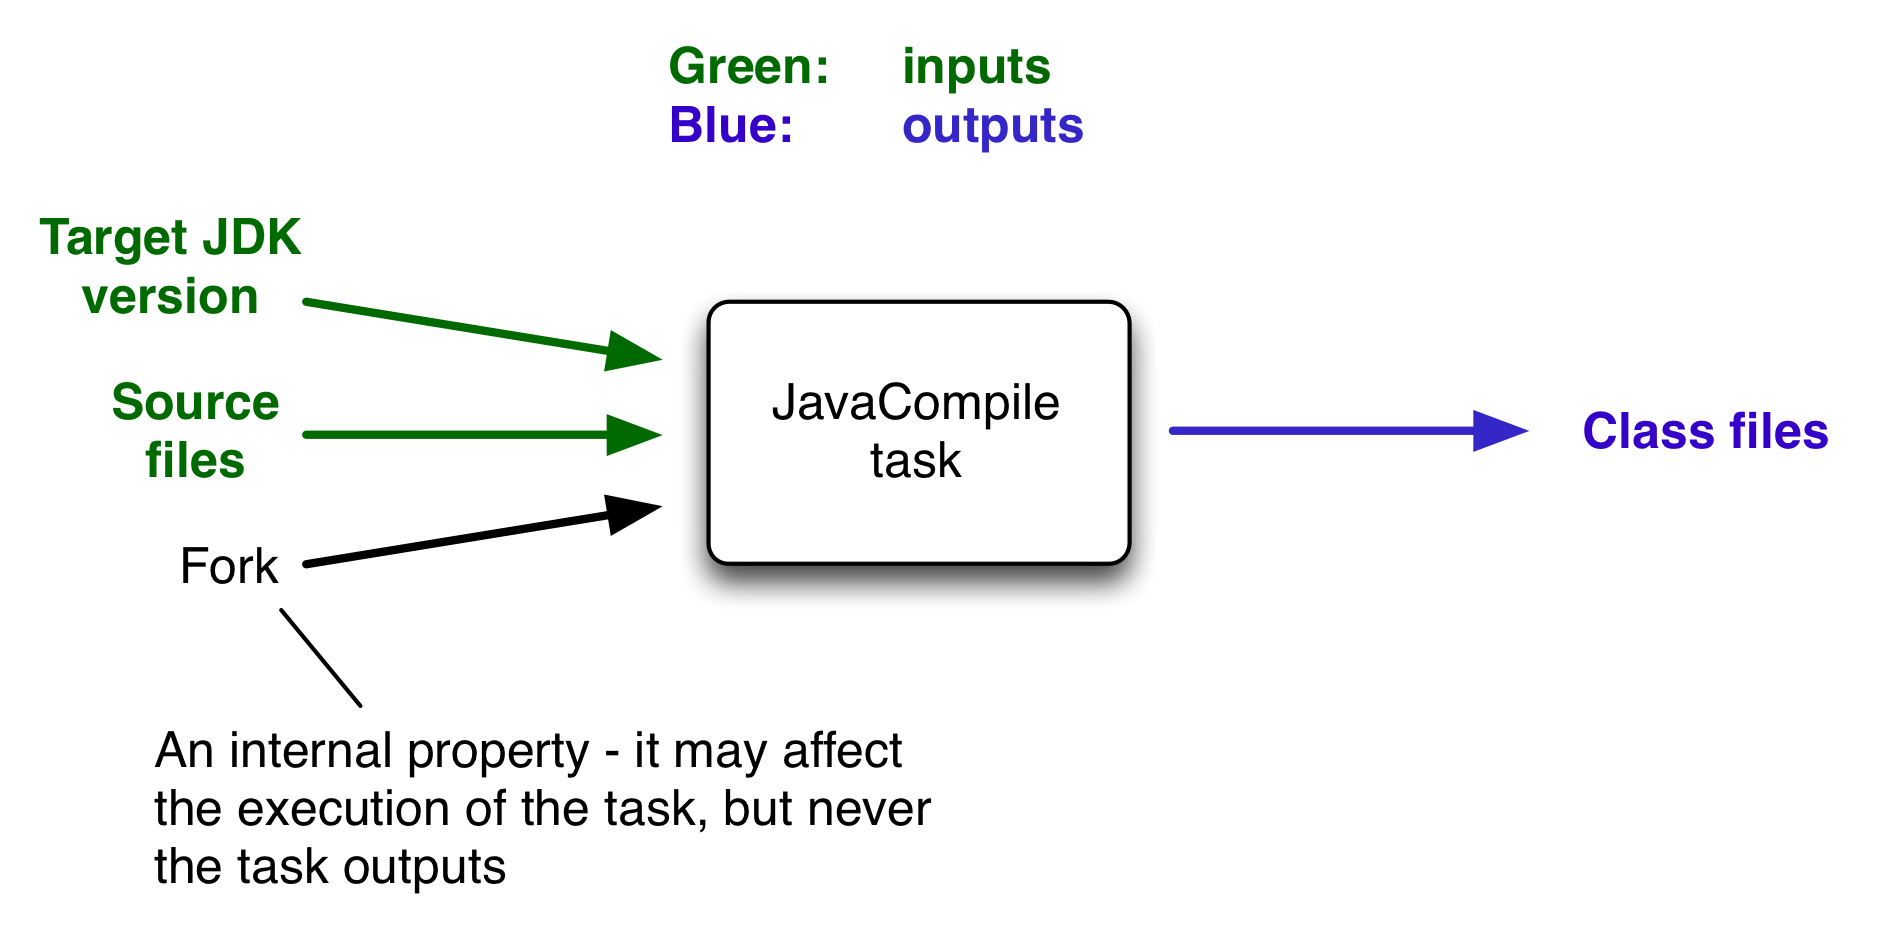
An important characteristic of an input is that it affects one or more outputs, as
you can see from the previous figure. Different bytecode is generated depending on the
content of the source files and the minimum version of the Java runtime you want to
run the code on. That makes them task inputs. But whether the compilation runs in a
forked process or not, determined by the fork property, has no
impact on what bytecode gets generated. In Gradle terminology, fork
is just an internal task property.
As part of incremental build, Gradle tests whether any of the task inputs or outputs have changed since the last build. If they haven’t, Gradle can consider the task up to date and therefore skip executing its actions. Also note that incremental build won’t work unless a task has at least one task output, although tasks usually have at least one input as well.
What this means for build authors is simple: you need to tell Gradle which task properties are inputs and which are outputs. If a task property affects the output, be sure to register it as an input, otherwise the task will be considered up to date when it’s not. Conversely, don’t register properties as inputs if they don’t affect the output, otherwise the task will potentially execute when it doesn’t need to. Also be careful of non-deterministic tasks that may generate different output for exactly the same inputs: these should not be configured for incremental build as the up-to-date checks won’t work.
Let’s now look at how you can register task properties as inputs and outputs.
If you’re implementing a custom task as a class, then it takes just two steps to make it work with incremental build:
- Create typed fields or properties (via getter methods) for each of your task inputs and outputs
- Add the appropriate annotation to each of those fields or getter methods
Gradle supports three main categories of inputs and outputs:
Simple values
Things like strings and numbers. More generally, a simple value can have any type that implements
Serializable.Filesystem types
These consist of the standard
Fileclass but also derivatives of Gradle’sFileCollectiontype and anything else that can be passed to either theProject.file(java.lang.Object)method - for single file/directory properties - or theProject.files(java.lang.Object[])method.Nested values
Custom types that don’t conform to the other two categories but have their own properties that are inputs or outputs. In effect, the task inputs or outputs are nested inside these custom types.
As an example, imagine you have a task that processes templates of varying types, such as FreeMarker, Velocity, Moustache, etc. It takes template source files and combines them with some model data to generate populated versions of the template files.
This task will have three inputs and one output:
- Template source files
- Model data
- Template engine
- Where the output files are written
When you’re writing a custom task class, it’s easy to register properties as inputs or outputs via annotations. To demonstrate, here is a skeleton task implementation with some suitable inputs and outputs, along with their annotations:
Example 18.23. Custom task class
buildSrc/src/main/java/org/example/ProcessTemplates.java
package org.example;

import java.io.File;
import java.util.HashMap;
import org.gradle.api.*;
import org.gradle.api.file.*;
import org.gradle.api.tasks.*;

public class ProcessTemplates extends DefaultTask {
    private TemplateEngineType templateEngine;
    private FileCollection sourceFiles;
    private TemplateData templateData;
    private File outputDir;

    @Input
    public TemplateEngineType getTemplateEngine() {
        return this.templateEngine;
    }

    @InputFiles
    public FileCollection getSourceFiles() {
        return this.sourceFiles;
    }

    @Nested
    public TemplateData getTemplateData() {
        return this.templateData;
    }

    @OutputDirectory
    public File getOutputDir() { return this.outputDir; }

    // + setter methods for the above - assume we’ve defined them

    @TaskAction
    public void processTemplates() {
        // ...
    }
}
buildSrc/src/main/java/org/example/TemplateData.java
package org.example;

import java.util.HashMap;
import java.util.Map;
import org.gradle.api.tasks.Input;

public class TemplateData {
    private String name;
    private Map<String, String> variables;

    public TemplateData(String name, Map<String, String> variables) {
        this.name = name;
        this.variables = new HashMap<>(variables);
    }

    @Input
    public String getName() { return this.name; }

    @Input
    public Map<String, String> getVariables() {
        return this.variables;
    }
}
Output of gradle processTemplates
> gradle processTemplates
:processTemplates

BUILD SUCCESSFUL
Output of gradle processTemplates
> gradle processTemplates
:processTemplates UP-TO-DATE

BUILD SUCCESSFUL
There’s plenty to talk about in this example, so let’s work through each of the input and output properties in turn:
templateEngineRepresents which engine to use when processing the source templates, e.g. FreeMarker, Velocity, etc. You could implement this as a string, but in this case we have gone for a custom enum as it provides greater type information and safety. Since enums implement
Serializableautomatically, we can treat this as a simple value and use the@Inputannotation, just as we would with aStringproperty.sourceFilesThe source templates that the task will be processing. Single files and collections of files need their own special annotations. In this case, we’re dealing with a collection of input files and so we use the
@InputFilesannotation. You’ll see more file-oriented annotations in a table later.templateDataFor this example, we’re using a custom class to represent the model data. However, it does not implement
Serializable, so we can’t use the@Inputannotation. That’s not a problem as the properties withinTemplateData- a string and a hash map with serializable type parameters - are serializable and can be annotated with@Input. We use@NestedontemplateDatato let Gradle know that this is a value with nested input properties.outputDirThe directory where the generated files go. As with input files, there are several annotations for output files and directories. A property representing a single directory requires
@OutputDirectory. You’ll learn about the others soon.
These annotated properties mean that Gradle will skip the task if none of the source files, template engine, model data or generated files have changed since the previous time Gradle executed the task. This will often save a significant amount of time. You can learn how Gradle detects changes later.
This example is particularly interesting because it works with collections of source files. What happens if only one source file changes? Does the task process all the source files again or just the modified one? That depends on the task implementation. If the latter, then the task itself is incremental, but that’s a different feature to the one we’re discussing here. Gradle does help task implementers with this via its incremental task inputs feature.
Now that you have seen some of the input and output annotations in practice, let’s take a look at all the annotations available to you and when you should use them. The table below lists the available annotations and the corresponding property type you can use with each one.
Table 18.1. Incremental build annotations
| Annotation | Expected property type | Description |
|---|---|---|
@ |
Any serializable type | A simple input value |
@ |
File* |
A single input file (not directory) |
@ |
File* |
A single input directory (not file) |
@ |
Iterable<File>* |
An iterable of input files (no directories) |
@ |
File* |
A single output file (not directory) |
@ |
File* |
A single output directory (not file) |
@ |
Iterable<File>* |
An iterable of output files (no directories) |
@ |
Iterable<File>* |
An iterable of output directories (no files) |
@ |
Any custom type | A custom type that may not implement Serializable but does
have at least one field or property marked with one of the annotations in this
table. It could even be another @Nested. |
@ |
Any type | Indicates that the property is neither an input nor an output. It simply affects the console output of the task in some way, such as increasing or decreasing the verbosity of the task. |
@ |
Any type | Indicates that the property is used internally but is neither an input nor an output. |
@ |
Used with @InputFiles or @InputDirectory
to tell Gradle to skip the task if the corresponding iterable of files or
directory are empty.
|
|
@ |
Used with any of the other incremental build annotations listed in the
Optional API documentation.
This annotation disables validation checks on the corresponding property.
See the section on validation
for more details.
|
|
@ |
Used with @InputFiles or @InputDirectory
to tell Gradle that a change in the order of the files should mark the task
out-of-date.
|
|
@ |
Used with any input file property to tell Gradle to only consider the given
part of the file paths as important. For example, if a property is annotated
with @PathSensitive(PathSensitivity.NAME_ONLY), then
moving the files around without changing their contents will not make the
task out-of-date.
|
|
* In fact, File
can be any type accepted by
Project.file(java.lang.Object)
and Iterable<File> can be any type accepted by
Project.files(java.lang.Object[]).
This includes instances of Callable, such as closures,
allowing for lazy evaluation of the property values. Be aware that the types
FileCollection and FileTree are
Iterable<File>s.
|
||
The Console and
Internal annotations in the table are special
cases as they don’t declare either task inputs or task outputs. So why use them? It's
so that you can take advantage of the Java Gradle
Plugin Development plugin to help you develop and publish your own plugins.
This plugin checks whether any properties of your custom task classes lack an
incremental build annotation. This protects you from forgetting to add an appropriate
annotation during development.
Custom task classes are an easy way to bring your own build logic into the arena of incremental build, but you don’t always have that option. That's why Gradle also provides an alternative API that can be used with any tasks, which we look at next.
When you don’t have access to the source for a custom task class, there is no way to add any of the annotations we covered in the previous section. Fortunately, Gradle provides a runtime API for scenarios just like that. It can also be used for ad-hoc tasks, as you'll see next.
This runtime API is provided through a couple of aptly named properties that are available on every Gradle task:
Task.getInputs()of typeTaskInputsTask.getOutputs()of typeTaskOutputs
These objects have methods that allow you to specify files, directories and values which constitute the task’s inputs and outputs. In fact, the runtime API has almost feature parity with the annotations. All it lacks is validation of whether declared files are actually files and declared directories are directories. Nor will it create output directories if they don't exist. But that's it.
Let’s take the template processing example from before and see how it would look as an ad-hoc task that uses the runtime API:
Example 18.24. Ad-hoc task
build.gradle
task processTemplatesAdHoc {
    inputs.property("engine", TemplateEngineType.FREEMARKER)
    inputs.files(fileTree("src/templates"))
    inputs.property("templateData.name", "docs")
    inputs.property("templateData.variables", [year: 2013])
    outputs.dir("$buildDir/genOutput2")

    doLast {
        // Process the templates here
    }
}
Output of gradle processTemplatesAdHoc
> gradle processTemplatesAdHoc
:processTemplatesAdHoc

BUILD SUCCESSFUL
As before, there’s much to talk about. To begin with, you should really write a custom task class for this as it’s a non-trivial implementation that has several configuration options. In this case, there are no task properties to store the root source folder, the location of the output directory or any of the other settings. That’s deliberate to highlight the fact that the runtime API doesn’t require the task to have any state. In terms of incremental build, the above ad-hoc task will behave the same as the custom task class.
All the input and output definitions are done through the methods on
inputs and outputs, such as
property(), files(), and
dir(). Gradle performs up-to-date checks on the argument
values to determine whether the task needs to run again or not. Each method
corresponds to one of the incremental build annotations, for example
inputs.property() maps to @Input and
outputs.dir() maps to @OutputDirectory.
The only difference is that the file(), files(),
dir() and dirs() methods don’t validate
the type of file object at the given path (file or directory), unlike the annotations.
One notable difference between the runtime API and the annotations is the
lack of a method that corresponds directly to @Nested.
That’s why the example uses two property() declarations
for the template data, one for each TemplateData property.
You should utilize the same technique when using the runtime API with nested
values.
Another type of example involves adding input and output definitions to
instances of a custom task class that lacks the requisite annotations. For
example, imagine that the ProcessTemplates task is provided
by a plugin and that it’s missing the incremental build annotations. In order
to make up for that deficiency, you can use the runtime API:
Example 18.25. Using runtime API with custom task type
build.gradle
task processTemplatesRuntime(type: ProcessTemplatesNoAnnotations) {
    templateEngine = TemplateEngineType.FREEMARKER
    sourceFiles = fileTree("src/templates")
    templateData = new TemplateData("test", [year: 2014])
    outputDir = file("$buildDir/genOutput3")

    inputs.property("engine",templateEngine)
    inputs.files(sourceFiles)
    inputs.property("templateData.name", templateData.name)
    inputs.property("templateData.variables", templateData.variables)
    outputs.dir(outputDir)
}
Output of gradle processTemplatesRuntime
> gradle processTemplatesRuntime
:processTemplatesRuntime

BUILD SUCCESSFUL
Output of gradle processTemplatesRuntime
> gradle processTemplatesRuntime
:processTemplatesRuntime UP-TO-DATE

BUILD SUCCESSFUL
As you can see, we can both configure the tasks properties and use those
properties as arguments to the incremental build runtime API. Using the runtime
API like this is a little like using doLast() and
doFirst() to attach extra actions to a task, except in this
case we’re attaching information about inputs and outputs. Note that if the
task type is already using the incremental build annotations, the runtime API
will add inputs and outputs rather than replace them.
The runtime API methods only allow you to declare your inputs and outputs in
themselves. However, the file-oriented ones return a builder - of type
TaskInputFilePropertyBuilder - that let’s
you provide additional information about those inputs and outputs.
You can learn about all the options provided by the builder in its API documentation, but we’ll show you a simple example here to give you an idea of what you can do.
Let’s say we don’t want to run the processTemplates task
if there are no source files, regardless of whether it’s a clean build or not.
After all, if there are no source files, there’s nothing for the task to do. The
builder allows us to configure this like so:
Example 18.26. Using skipWhenEmpty() via the runtime API
build.gradle
task processTemplatesRuntimeConf(type: ProcessTemplatesNoAnnotations) {
    // ...
    sourceFiles = fileTree("src/templates") {
        include "**/*.fm"
    }

    inputs.files(sourceFiles).skipWhenEmpty()
    // ...
}
Output of gradle clean processTemplatesRuntimeConf
> gradle clean processTemplatesRuntimeConf
:processTemplatesRuntimeConf UP-TO-DATE

BUILD SUCCESSFUL
So the TaskInputs.files() method returns a builder that has
a skipWhenEmpty() method. By calling this method, we tell
Gradle that the task should be considered up to date if the corresponding input
file collection is empty, even if the task hasn't run before.
Prior to Gradle 3.0, you had to use the TaskInputs.source()
and TaskInputs.sourceDir() methods to get the same behavior
as with skipWhenEmpty(). These methods are now deprecated and
should not be used with Gradle 3.0 and above.
Now that you have seen both the annotations and the runtime API, you may be wondering which API you should be using. Our recommendation is to use the annotations wherever possible, and it’s sometimes worth creating a custom task class just so that you can make use of them. The runtime API is more for situations in which you can’t use the annotations.
Once you declare a task’s formal inputs and outputs, Gradle can then infer things about those properties. For example, if an input of one task is set to the output of another, that means the first task depends on the second, right? Gradle knows this and can act upon it.
We’ll look at this feature next and also some other features that come from Gradle knowing things about inputs and outputs.
Consider an archive task that packages the output of the
processTemplates task. A build author will see that the archive
task obviously requires processTemplates to run first and so
may add an explicit dependsOn. However, if you define the
archive task like so:
Example 18.27. Inferred task dependency via task outputs
build.gradle
task packageFiles(type: Zip) {
    from processTemplates.outputs
}
Output of gradle clean packageFiles
> gradle clean packageFiles
:processTemplates
:packageFiles

BUILD SUCCESSFUL
Gradle will automatically make packageFiles depend on
processTemplates. It can do this because it’s aware that one
of the inputs of packageFiles requires the output of the processTemplates task.
We call this an inferred task dependency.
The above example can also be written as
Example 18.28. Inferred task dependency via a task argument
build.gradle
task packageFiles2(type: Zip) {
    from processTemplates
}
Output of gradle clean packageFiles2
> gradle clean packageFiles2
:processTemplates
:packageFiles2

BUILD SUCCESSFUL
This is because the from() method can accept a task object
as an argument. Behind the scenes, from() uses the
project.files() method to wrap the argument, which in turn
exposes the task’s formal outputs as a file collection. In other words, it’s a
special case!
The incremental build annotations provide enough information for Gradle to perform some basic validation on the annotated properties. In particular, it does the following for each property before the task executes:
@InputFile- verifies that the property has a value and that the path corresponds to a file (not a directory) that exists.@InputDirectory- same as for@InputFile, except the path must correspond to a directory.@OutputDirectory- verifies that the path doesn’t match a file and also creates the directory if it doesn’t already exist.
Such validation improves the robustness of the build, allowing you to identify issues related to inputs and outputs quickly.
You will occasionally want to disable some of this validation, specifically
when an input file may validly not exist. That’s why Gradle provides the
@Optional annotation: you use it to tell Gradle that a
particular input is optional and therefore the build should not fail if the
corresponding file or directory doesn’t exist.
One last benefit of defining task inputs and outputs is continuous build. Since
Gradle knows what files a task depends on, it can automatically run a task again
if any of its inputs change. By activating continuous build when you run Gradle -
through the --continuous or -t options - you
will put Gradle into a state in which it continually checks for changes and executes
the requested tasks when it encounters such changes.
You can find out more about this feature in Chapter 9, Continuous build.
Everything you’ve seen so far in this section will cover most of the use cases you’ll encounter, but there are some scenarios that need special treatment. We’ll present a few of those next with the appropriate solutions.
Have you ever wondered how the from() method of the
Copy task works? It’s not annotated with @InputFiles
and yet any files passed to it are treated as formal inputs of the task. What’s
happening?
The implementation is quite simple and you can use the same technique for your own
tasks to improve their APIs. Write your methods so that they add files directly to
the appropriate annotated property. As an example, here’s how to add a
sources() method to the custom ProcessTemplates
class we introduced earlier:
Example 18.29. Declaring a method to add task inputs
buildSrc/src/main/java/org/example/ProcessTemplates.java
public class ProcessTemplates extends DefaultTask {
    // ...
    private FileCollection sourceFiles = getProject().files();

    @SkipWhenEmpty
    @InputFiles
    @PathSensitive(PathSensitivity.NONE)
    public FileCollection getSourceFiles() {
        return this.sourceFiles;
    }

    public void sources(FileCollection sourceFiles) {
        this.sourceFiles = this.sourceFiles.plus(sourceFiles);
    }

    // ...
}
build.gradle
task processTemplates(type: ProcessTemplates) {
    templateEngine = TemplateEngineType.FREEMARKER
    templateData = new TemplateData("test", [year: 2012])
    outputDir = file("$buildDir/genOutput")

    sources fileTree("src/templates")
}
Output of gradle processTemplates
> gradle processTemplates
:processTemplates

BUILD SUCCESSFUL
In other words, as long as you add values and files to formal task inputs and outputs during the configuration phase, they will be treated as such regardless from where in the build you add them.
If we want to support tasks as arguments as well and treat their outputs as the
inputs, we can use the project.files() method like so:
Example 18.30. Declaring a method to add a task as an input
buildSrc/src/main/java/org/example/ProcessTemplates.java
// ...
public void sources(Task inputTask) {
    this.sourceFiles = this.sourceFiles.plus(getProject().files(inputTask));
}
// ...
build.gradle
task copyTemplates(type: Copy) {
    into "$buildDir/tmp"
    from "src/templates"
}

task processTemplates2(type: ProcessTemplates) {
    // ...
    sources copyTemplates
}
Output of gradle processTemplates2
> gradle processTemplates2
:copyTemplates
:processTemplates2

BUILD SUCCESSFUL
This technique can make your custom task easier to use and result in cleaner build
files. As an added benefit, our use of getProject().files() means
that our custom method can set up an inferred task dependency.
One last thing to note: if you are developing a task that takes collections of source
files as inputs, like this example, consider using the built-in
SourceTask. It will save you having to
implement some of the plumbing that we put into ProcessTemplates.
When you want to link the output of one task to the input of another, the types
often match and a simple property assignment will provide that link. For example, a
File output property can be assigned to a File
input.
Unfortunately, this approach breaks down when you want the files in a task’s
@OutputDirectory (of type File) to become the
source for another task’s @InputFiles property (of type
FileCollection). Since the two have different types, property
assignment won’t work.
As an example, imagine you want to use the output of a Java compilation task - via
the destinationDir property - as the input of a custom task that
instruments a set of files containing Java bytecode. This custom task, which we’ll
call Instrument, has a classFiles property
annotated with @InputFiles. You might initially try to configure
the task like so:
Example 18.31. Failed attempt at setting up an inferred task dependency
build.gradle
apply plugin: "java"

task badInstrumentClasses(type: Instrument) {
    classFiles = fileTree(compileJava.destinationDir)
    destinationDir = file("$buildDir/instrumented")
}
Output of gradle clean badInstrumentClasses
> gradle clean badInstrumentClasses
:clean UP-TO-DATE
:badInstrumentClasses UP-TO-DATE

BUILD SUCCESSFUL
There’s nothing obviously wrong with this code, but you can see from the console
output that the compilation task is missing. In this case you would need to add an
explicit task dependency between instrumentClasses and
compileJava via dependsOn. The use of
fileTree() means that Gradle can’t infer the task dependency itself.
One solution is to use the TaskOutputs.files property, as
demonstrated by the following example:
Example 18.32. Setting up an inferred task dependency between output dir and input files
build.gradle
task instrumentClasses(type: Instrument) {
    classFiles = compileJava.outputs.files
    destinationDir = file("$buildDir/instrumented")
}
Output of gradle clean instrumentClasses
> gradle clean instrumentClasses
:clean
:compileJava
:instrumentClasses

BUILD SUCCESSFUL
Alternatively, you can get Gradle to access the appropriate property itself by using the
project.files() method in place of project.fileTree():
Example 18.33. Setting up an inferred task dependency with files()
build.gradle
task instrumentClasses2(type: Instrument) {
    classFiles = files(compileJava)
    destinationDir = file("$buildDir/instrumented")
}
Output of gradle clean instrumentClasses2
> gradle clean instrumentClasses2
:clean
:compileJava
:instrumentClasses2

BUILD SUCCESSFUL
Remember that files() can take tasks as arguments, whereas
fileTree() cannot.
The downside of this approach is that all file outputs of the source task become the
input files of the target - instrumentClasses in this case. That’s fine
as long as the source task only has a single file-based output, like the
JavaCompile task. But if you have to link just one output property
among several, then you need to explicitly tell Gradle which task generates the input
files using the builtBy method:
Example 18.34. Setting up an inferred task dependency with builtBy()
build.gradle
task instrumentClassesBuiltBy(type: Instrument) {
    classFiles = fileTree(compileJava.destinationDir) {
        builtBy compileJava
    }
    destinationDir = file("$buildDir/instrumented")
}
Output of gradle clean instrumentClassesBuiltBy
> gradle clean instrumentClassesBuiltBy
:clean
:compileJava
:instrumentClassesBuiltBy

BUILD SUCCESSFUL
You can of course just add an explicit task dependency via dependsOn,
but the above approach provides more semantic meaning, explaining why
compileJava has to run beforehand.
Gradle automatically handles up-to-date checks for output files and directories, but what if the task output is something else entirely? Perhaps it’s an update to a web service or a database table. Gradle has no way of knowing how to check whether the task is up to date in such cases.
That’s where the upToDateWhen() method on TaskOutputs
comes in. This takes a predicate function that is used to determine whether a task is up to
date or not. One use case is to disable up-to-date checks completely for a task, like so:
Example 18.35. Ignoring up-to-date checks
build.gradle
task alwaysInstrumentClasses(type: Instrument) {
    classFiles = files(compileJava)
    destinationDir = file("$buildDir/instrumented")
    outputs.upToDateWhen { false }
}
Output of gradle clean alwaysInstrumentClasses
> gradle clean alwaysInstrumentClasses
:compileJava
:alwaysInstrumentClasses

BUILD SUCCESSFUL
Output of gradle alwaysInstrumentClasses
> gradle alwaysInstrumentClasses
:compileJava UP-TO-DATE
:alwaysInstrumentClasses

BUILD SUCCESSFUL
The { false } closure ensures that copyResources
will always perform the copy, irrespective of whether there is no change in the inputs or
outputs.
You can of course put more complex logic into the closure. You could check whether a particular record in a database table exists or has changed for example. Just be aware that up-to-date checks should _save_ you time. Don’t add checks that cost as much or more time than the standard execution of the task. In fact, if a task ends up running frequently anyway, because it’s rarely up to date, then it may not be worth having an up-to-date check at all. Remember that your checks will always run if the task is in the execution task graph.
One common mistake is to use upToDateWhen() instead of
Task.onlyIf(). If you want to skip a task on the basis of some condition
unrelated to the task inputs and outputs, then you should use onlyIf().
For example, in cases where you want to skip a task when a particular property is set or
not set.
Before a task is executed for the first time, Gradle takes a snapshot of the inputs. This snapshot contains the paths of input files and a hash of the contents of each file. Gradle then executes the task. If the task completes successfully, Gradle takes a snapshot of the outputs. This snapshot contains the set of output files and a hash of the contents of each file. Gradle persists both snapshots for the next time the task is executed.
Each time after that, before the task is executed, Gradle takes a new snapshot of the inputs and outputs. If the new snapshots are the same as the previous snapshots, Gradle assumes that the outputs are up to date and skips the task. If they are not the same, Gradle executes the task. Gradle persists both snapshots for the next time the task is executed.
Gradle also considers the code of the task as part of the inputs to the task. When a task, its actions, or its dependencies change between executions, Gradle considers the task as out-of-date.
Gradle understands if a file property (e.g. one holding a Java classpath) is order-sensitive. When comparing the snapshot of such a property, even a change in the order of the files will result in the task becoming out-of-date.
Note that if a task has an output directory specified, any files added to that directory since the last time it was executed
are ignored and will NOT cause the task to be out of date. This is so unrelated tasks may share an output directory without interfering with each other.
If this is not the behaviour you want for some reason, consider using TaskOutputs.upToDateWhen(groovy.lang.Closure)
Sometimes you want to have a task whose behavior depends on a large or infinite number value range of parameters. A very nice and expressive way to provide such tasks are task rules:
Example 18.36. Task rule
build.gradle
tasks.addRule("Pattern: ping<ID>") { String taskName ->
    if (taskName.startsWith("ping")) {
        task(taskName) << {
            println "Pinging: " + (taskName - 'ping')
        }
    }
}
Output of gradle -q pingServer1
> gradle -q pingServer1
Pinging: Server1
The String parameter is used as a description for the rule, which is shown with gradle tasks.
Rules are not only used when calling tasks from the command line. You can also create dependsOn relations on rule based tasks:
Example 18.37. Dependency on rule based tasks
build.gradle
tasks.addRule("Pattern: ping<ID>") { String taskName ->
    if (taskName.startsWith("ping")) {
        task(taskName) << {
            println "Pinging: " + (taskName - 'ping')
        }
    }
}

task groupPing {
    dependsOn pingServer1, pingServer2
}
Output of gradle -q groupPing
> gradle -q groupPing
Pinging: Server1
Pinging: Server2
If you run “gradle -q tasks” you won't find a task named
“pingServer1” or “pingServer2”, but this script is executing logic
based on the request to run those tasks.
Finalizers tasks are an incubating feature (see Section C.1.2, “Incubating”).
Finalizer tasks are automatically added to the task graph when the finalized task is scheduled to run.
Example 18.38. Adding a task finalizer
build.gradle
task taskX << {
    println 'taskX'
}
task taskY << {
    println 'taskY'
}

taskX.finalizedBy taskY
Output of gradle -q taskX
> gradle -q taskX
taskX
taskY
Finalizer tasks will be executed even if the finalized task fails.
Example 18.39. Task finalizer for a failing task
build.gradle
task taskX << {
    println 'taskX'
    throw new RuntimeException()
}
task taskY << {
    println 'taskY'
}

taskX.finalizedBy taskY
Output of gradle -q taskX
> gradle -q taskX
taskX
taskY
On the other hand, finalizer tasks are not executed if the finalized task didn't do any work, for example if it is considered up to date or if a dependent task fails.
Finalizer tasks are useful in situations where the build creates a resource that has to be cleaned up regardless of the build failing or succeeding. An example of such a resource is a web container that is started before an integration test task and which should be always shut down, even if some of the tests fail.
To specify a finalizer task you use the Task.finalizedBy(java.lang.Object[]) method.
This method accepts a task instance, a task name, or any other input accepted by Task.dependsOn(java.lang.Object[]).
If you are coming from Ant, an enhanced Gradle task like Copy seems like a cross between an Ant target and an Ant task. Although Ant's tasks and targets are really different entities, Gradle combines these notions into a single entity. Simple Gradle tasks are like Ant's targets, but enhanced Gradle tasks also include aspects of Ant tasks. All of Gradle's tasks share a common API and you can create dependencies between them. These tasks are much easier to configure than an Ant task. They make full use of the type system, and are more expressive and easier to maintain.
[7] You might be wondering why there is neither an import for the
StopExecutionException
nor do we access it via its fully qualified name. The reason is, that Gradle adds a set of default imports
to your script (see Section 17.8, “Default imports”).
[8] You will also see UP-TO-DATE next to tasks that have no actions,
even though that’s nothing to do with incremental build.